Tuesday, February 19, 2019

Building a fiberglass mold... Window Frames.

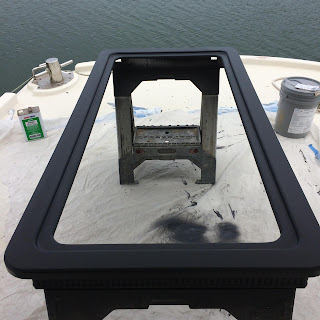
MDF plug to pull a mold off.
Duratec Grey Surfacing primer to have a sanding surface. 
First coat.
Second coat sprayed.
Spray gelcoat.

Laid up mold. 
Plastic to keep it clean, fiberglass roll holder and table built. 

First molded window frame pulled from the mold.  Built ten and bonded to cabin house.  
Awlcraft 2000 in snow white. 

Tuesday, August 8, 2017

Gotchas and cautinary tales of adhesion issues.

Some of the things that cause adhesion issues, are small.

You can have adhesion problems, if you use epoxy to make repairs and don't fully remove the amine blush.  This stuff is water soluble, but waxy and water beads up on it.  Paint, primer, and other epoxy fairing compounds do not stick to it. 

If you take a spray bottle, and go around and mist the boat, you want the water to not bead up and hang on your repair areas.  You can use red scotchbrite and water, to scrub the repair areas.  If you use clean lint free white cotton rags, the amine blush comes off as an orange/brown color on the rag.  Scrub, and rub, until you have clean water on a clean rag.

Next you want to solvent wash the surface.  I like to use Interlux 202 as a cleaner, as it lasts a long time on a rag.  You want two rags, one dry and one wet, and fold them into squares so you can fold to show a clean face as either gets dirty.  You wet the surface with one, and dry the surface with the other.

The goal, is not to take a spot of contamination and spread it evenly over the whole boat, but instead of lift any oils, greases, or contaminates that the solvent can lift and put them on a dry lint free rag, and then turn the rag to a new clean face.

Cautionary tales, have to do with hydraulic fuel from yard equipment, and diesel soot from near by boats.

Most adhesion problems I've seen, involve surface contaminates that occur mid-job.  The closer to the high build stage you are, the more quickly you want to move through to finish primer, as the more talc in the material you are putting on the more absorbent it is.   Little round spots of oil, are something to pay attention for, as are soot splatters.

If you are near an airport and have exhaust dirt, or down wind of a burger joint that has a big exhaust hood you can have environmental related contamination based on the wind direction, so just keep in mind that not all oil arrives from shoes!

Fairing: Choosing your grit, choosing your board, when to prime, when to sand.

Fairing, is measuring and a little math.


There is a learning curve with using Awlgrips Awlfair to fair, and deciding when it it is time to prime.  The trouble with priming, is that most people close the door behind them and have trouble going back a stage to fairing after the first prime if things were not quite far enough along. 

If you prime over a raised lip edge like the above picture, but were happy enough with the shape to have primed it...  It takes a bit of gumption to pick up the sander and long board and block it back flat instead of just pulling a little filler across the lip and making a hump.  Most folks can't see that in a finished paint job, but a wavy shadow line when the sun comes across the hull will show it. 


My two cents, is to always jump up to the grit you will be sanding the primer with, before you prime and look for areas where you still have 40 or 80 grit marks.  Test the surface to see if you will be making contact, prior to priming.  I use a 3M 16 inch long board, with 3M gold roll paper adhesive backed paper to do this with a DA of the same grit in the other hand.

If you have been sanding in 80 grit, or 120 grit on a DA, and are thinking you want to prime with a high build primer, a 16 inch board will show you where the wiggles and low spots will be and the burn through that first layer of primer. 

The math, aspect involves finding a way to gauge the depth of the low spots around the minor high spots that are in a surface.  I like to use a 2 foot by 2 foot square as the working surface, as you can easily smooth out an area that large through progressively finer grits, quickly.

I like 3M Dry Guide Coat, to show the sanding scratches, and apply a fresh coat after going over the areas in question...  One of the things that works rather well, is to do a 2x2 square foot area, twice with guide coat and prove that the scratch profile has been changed.  It doesn't take a lot of sanding to wipe away the guide coat, but sometimes it takes an extra minute or two to get things smoothed out to the next finer grit.  Dusting things down with guide coat twice, proves you did it.  Sometimes that can save your bacon when it comes to putting on a layer of primer, and on convex or concave surfaces it saves some elbow work with a long board getting things smooth enough to see what you've got.

If we know that we have 80 grit sanding scratches present all over the surface, we can go to a larger sander with 120 grit sandpaper, and remove the 80 grit scratches that come off easily on the first guide coated sanding.   

80 grit scratches have a depth of .022, while 120 grit scratches have a depth of .012.

For reference, 180 grit are .004 and 220 grit are .002.

The goal of finishing, is to get down fine enough that primer will fill the scratches that are present without shrinking and printing the scratches at a later date.  That obligates you to remove the 80 grit scratches, and the 120 grit scratches.

The Measuring aspect, means that if your 16 inch board passes over an area that still has 80 grit scratches with 120 grit, that your high spots are at least .012 deep.

What this means when you go to prime the surface, is that for a dry mil thickness (A mil is equal to .001) a product that builds 2-3 dry mils per full wet coat, is going to take a lot of passes and a lot of coats to build up enough material not to remain a low spot.  Removing the material, around the low spot to the extent that the long board still fits the surface, saves a lot of material and time when priming. 

The beautiful thing about primer, is that it builds up a surface evenly.  The only bad thing about that is if you build up an imperfect surface, the same low spots and high spots are present until you sand off all the material on the high spots.  That is a lot more work, than sanding out the base material smooth enough that the first few shots of primer are in the ball park without burning through.

That is the math behind burning through primer back into your fairing material... The learning curve, is to figure out a way to gauge when you can Prime and do so successfully, without burning through.  Fairing over an imperfect hull, and bumping back into gelcoat or laminate is where you have to know when to stop your sanding and start adding material. 

Putting this all together, is to know your paint systems build potential.  Get the base surface to a smooth enough finish, that you can "Prime your way out" to a finished paint job. 


Machine Fairing: The Variable Speed buffer/Polisher.

Fairing, can be a first step in painting depending on the quality of the surface to start.  A smooth boat with failing gel coat, normally is primed from the start with only chips and dings puttied. 

Sometimes a boat is painted due to repairs, and in the process of making repairs a side or bow is faired in to blend the surfaces together so you can't see where the original surface stops and the repaired area begins.

Most of the time, the heavy lifting in fairing is done by Machine Sanders.  My favorite, is the Makita 9227c.  It is a variable speed buffer/polisher that can be equipped with 8 inch vinyl backing pads for sand paper.

This can involve some finesse, but the gist is a variable speed sander lets you turn coarse grit paper over a large surface and remove material slowly.  Given you keep both your hands and feet in motion, and don't pause you can remove material evenly over a large area.

Applying putty, normally requires putting on more than is required and sanding down to a smooth shape.  The larger the sander, the smoother the final surface, at least on convex surfaces.  Inside corners and concave surfaces require small enough pads to define the shape without cutting grooves. 

I only sand in vertical overlapping passes with power sanders, as long board sanding uses your shoulders and elbows and easily shows vertical low spots.  Horizontal low spots are harder to detect with long boards, so if you never power sand side to side, you have less work ahead of you when it comes time to test with a long board.

Tuesday, July 25, 2017

Sanding, Sanders, Sand paper... I've Sanded Enough Already!

90% of all boat work, seems to involve sanding.

Of what involves sanding...  Seems to involve sanding the same pieces, repeatedly with little visible change until they are painted.

The irony of Re-painting something that has already been painted, is that unless the existing paint is the same type as what you are painting with, and in relatively good condition it ends up coming off...  Which means sanding with a rough grit, over an area that has been gone over thoroughly in days gone by.

The difference between Sanders, make a big difference in the amount of time it takes to do a job.

Dual Action and Random Orbital Sanders spin and oscillate with a path that doesn't put inline scratches into a surface and makes it easier to get something smooth.  A grinder, or polisher/sander that doesn't take a different orbit can scar the surface you are working.  That may or may not be a big deal depending on how far you are along in the painting process. 

For bulk material removal, and general shaping I like a Makita 9227c with an 8 inch vinyl pad.  They remove a lot of material quickly, which can be a very good or very bad thing. 

 If you have scratches that are in a straight lines, or circles the next finer grit follows the same way and keys into them and they don't go away.  That is why a coarser grit on a R.O.S. looks like the next finer grit, on a hand block.

Of the Random Orbital Sanders, there are a few differences...  You can have square pads, or round pads, and even long board pads.  There are differences between the size orbits the pad moves, a fine finishing sander may be 3/32nds, while other sanders have a 3/16th orbit and even in very fine grits will show rings in the finish.

I'm going to assume at this juncture, that you are equipped with only electric supply and not a large air compressor suited for keeping up with pneumatic tools.  If you have air, I like Dynabrade DA's, and Hutchins inline sanders. 

I've found that the Dewalt product line does a decent job for a relatively inexpensive cost when only electricity is available.  Most of the time a 5 inch random orbital sander fits where you need to sand on a boat, though a 6 inch pad does a flatter job. 

The Porter Cable 6inch Orbital sander, is another companion...  They don't last all that long if you put them into 8 hour days, and lean on them at all... but do a lot of work due to the larger orbit and greater power than 5 inch sanders have.

1/4 sheet square pad sanders have a place too, as they vibrate.  Vibrating means that you don't have swirl marks.  On small parts, and inside corners they can make lighter work than what would otherwise need to be hand sanded.  I use 80 grit, and 220 grit almost exclusively on these.  80 grit for paint stripping, and fairing in putty/high build primer.   220 grit for all finish sanding and paint de-nibbing.

As far as sandpaper goes, cheap sandpaper doesn't last very long or cut as fast as decent paper.  3M gold, is about the price point where you are paying for what you get, which is... decent sand-paper.  I use 3m Gold from 80 grit through 320 grit, in a combination of hookit backing, and sitckit depending on the tool. 

In 40 grit, you can spend a little more and buy Norton Blue-Mag, but for most work Green F weight 3M production paper works good enough for the cost.


Information for the DIY boat builder about how to get a good paint job.

The common wisdom, is that a paint job is 90% prep and 10% application, and it is true...  But that only sums up half of what goes into a paint job.

The other half of painting, is experience of knowing what to do and when the prep work is done at each phase.  I'm writing this to try to share some of my experiences, and hopefully save you some time.

The biggest part of a good paint job, is deciding what level of finish you want to aim... and studying the hull very closely to see where it may have issues...  In addition to just dock bruises and scrapes.  You can make a very shiny hull, that shows a lot of waves and shapes, or a very fair hull that has a rough finish. 

To get a perfectly smooth paint job, it requires a fair bit of long board sanding and screeding on filler, as a fiberglass boat may have come out of a mold perfect, but over time the stresses and heat cycles starts showing bulkheads and tabbing lines.  If you have a dark colored hull, this is easier to see, as the heat cycles post-cure the hull and shrink it around its bulkheads showing them as though they are a rib cage.  If you have a white boat now, and are going to paint it dark blue or another dark color, you need to be aware that the initial finish may be perfect but the boat is going to post-cure and move a bit after its first summer.  It may be worth doing a first pass, paint job to make her dark and lay a foundation for later fairing...  Otherwise you may spend a lot of time and materials, that will not look quite so perfect just due to the nature of boats. 

So, sighting down and around the boat looking for bumps, lumps, and low spots is required if you want a fair, and shiny finish.

If you are dealing with a boat that has already been painted, you need to figure out what kind of paint is on it...  You can find out a lot by taking the thinner, T0006, and a box cutter and scoring the hull over a 2 inch square somewhere close to an area that already has docking scars.  Hold the rag to it for a minute or two, and if the paint lifts you need to take the boat back down to the gelcoat.

In most industries, be it a boat, motorcycle, or car...  They sell better with a pretty paint job, and a pretty paint job with poor prep work is a "Scuff and Puff."  You may have an Awlgrip top coat, and a receipt for the labor and materials...  over an enamel painted boat.  This should be a sin, as the enamel paint under a two part polyurethane starts to suffer from hydrolysis and the water vapor pressure that the porous gel-coat, and porous enamel want to release, gets trapped under the not-so-porous two part Polyurethane.  Where the enamel lifts you get little brown spots under the first layer of paint. 

Finding a job like that, is a sad thing if you want the boat not to continually show blisters in its paint, because once you know the top coat is awlgrip, people will paint and repaint fixing blisters as they come season after season and then you really do have a mess to take back down to a bare hull.

Awlgrip is tough enough that water based paint strippers don't touch it, so you may end up sanding the top layer off if you want to chemically strip the underlying enamel.  I use Aqua-Strip around cove stripes and areas with a lot of detail, as you can save a mountain of hand sanding time...  Most of those areas have poor adhesion anyway, due to the shape and minimal fillet radius.

The next part of this series will be about sanding.  


Building a fiberglass mold... Window Frames.

MDF plug to pull a mold off. Duratec Grey Surfacing primer to have a sanding surface.  First coat. Second coat sprayed. Spray ...